Exposing a selfhosted service using Cloudflare tunnel
Cloudflare tunnel is one of the easiest and safest option to expose a self hosted service to the internet. In this guide, we will walk through the full setup and the caveats of using Cloudflare tunnel
If you have a service or website that you want to expose to the Internet, Cloudflare tunnel is one of the easiest, secure (with some major things to consider – more on that later) and free solution.
Some context
If you don't care about the context and just want to get into the action, feel free to skip this section, but I would still suggest you read the Security section
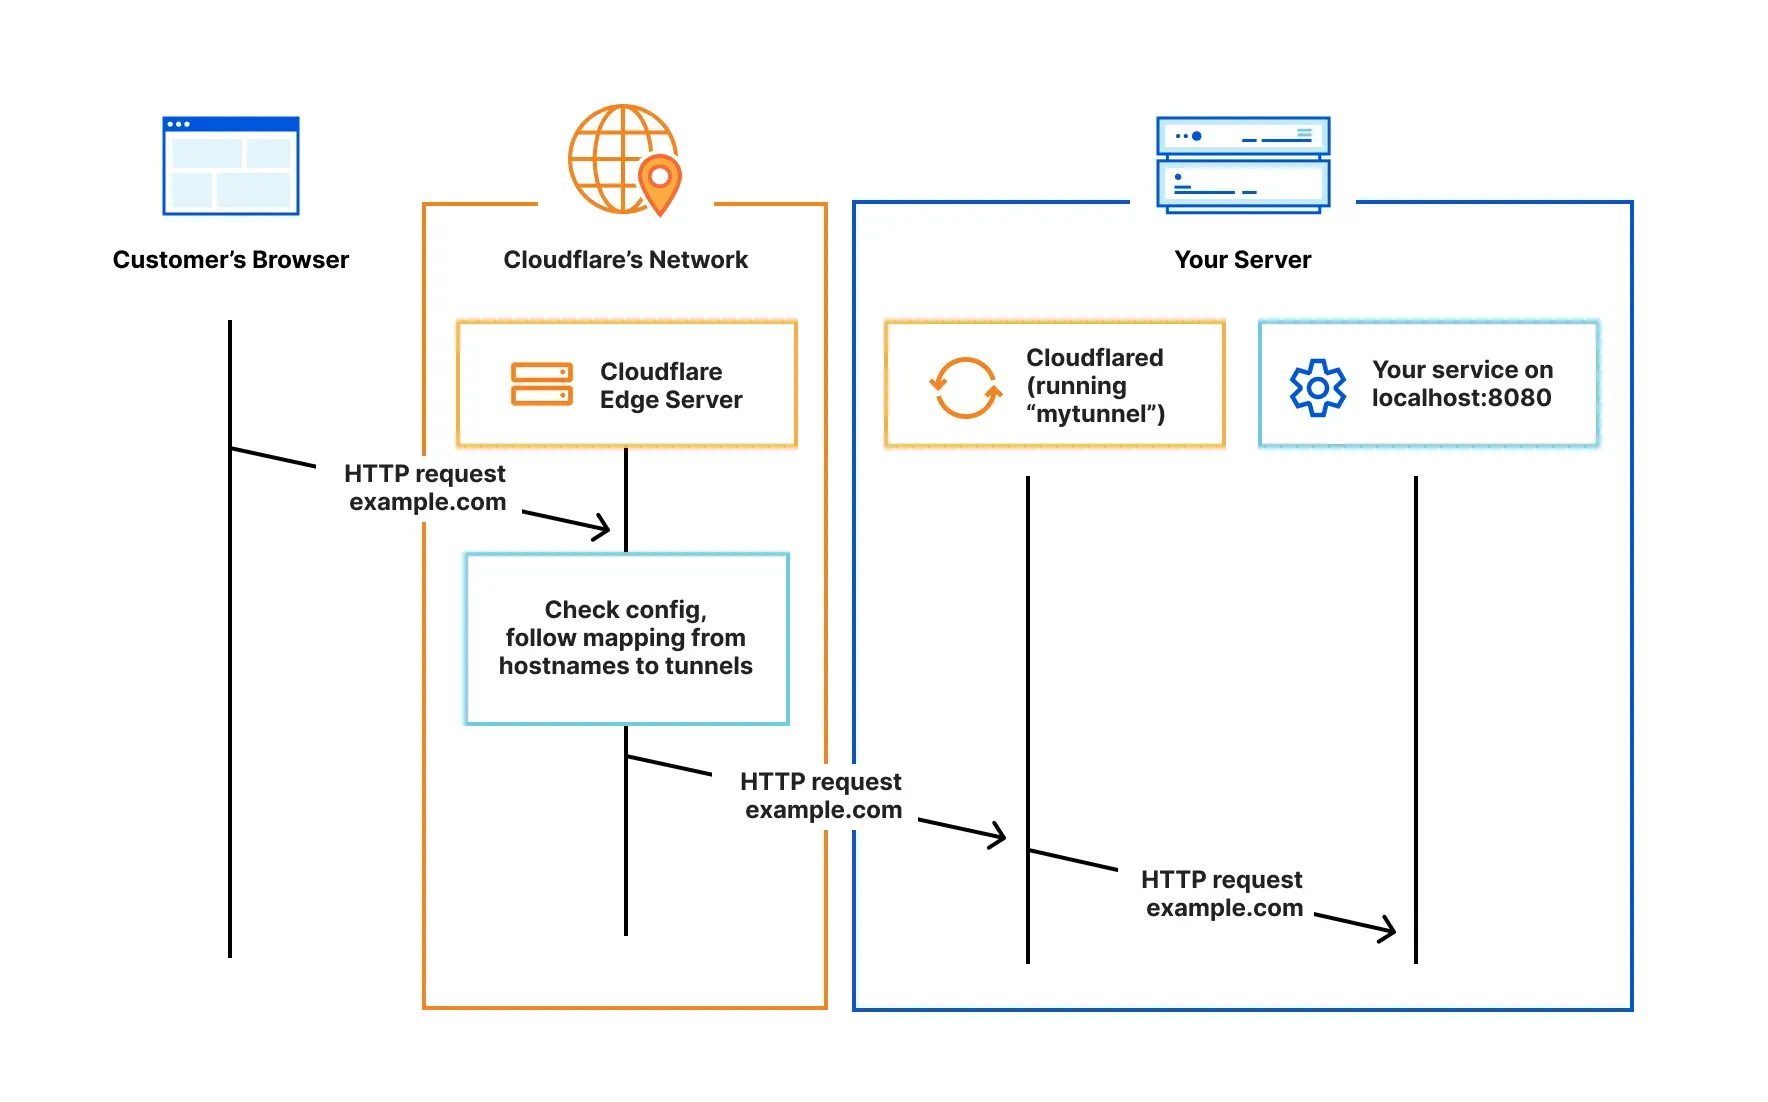
How does it work
You can read more about it in Cloudflare docs HERE
Give me TL;DR
- You install a simple
daemoncalledcloudflaredin your infrastructure. In my case, I have a Debian Virtual Machine running on an old Mini PC. - This daemon makes an outbound only connection to Cloudflare's network – meaning you do not need to setup any port forwarding or firewall rules in your router.
- Now, Cloudflare can route traffic to your service through this tunnel
How secure is Cloudflare tunnel?
So let us clarify what it protects you against and what it does not.
Cloudflare can see all your traffic
This should not come as a surprise. If you use Cloudflare, you are terminating your SSL/TLS connection in Cloudflare. This is no different than using Cloudflare CDN normally. So, if you are particularly concerned about Cloudflare looking into your traffic, you should not be using Cloudflare at all.
I personally only use Cloudflare CDN and Cloudflare Tunnel with publicly available services such as this website, my analytics etc. For all my private homelab services, I use Wireguard directly to my home network and is not exposed to the internet.
Cloudflare will give you protection from bad traffic
DDOS protection, CDN, basic web application firewall (WAF) etc. all come with the free plan too. This means Cloudflare will protect you against some attacks.
Cloudflare cannot protect you against all vulnerabilities / exploits
Let us assume that you have a WordPress blog you selfhost and is exposed using Cloudflare tunnel. If someone finds a vulnerability in that blog and exploits Cloudflare may not be able to protect you. Sure, if there it is some well known exploit, Cloudflare WAF may protect you, but remember that it is your responsibility to keep your service secure and updated.
You should still isolate your internet facing host
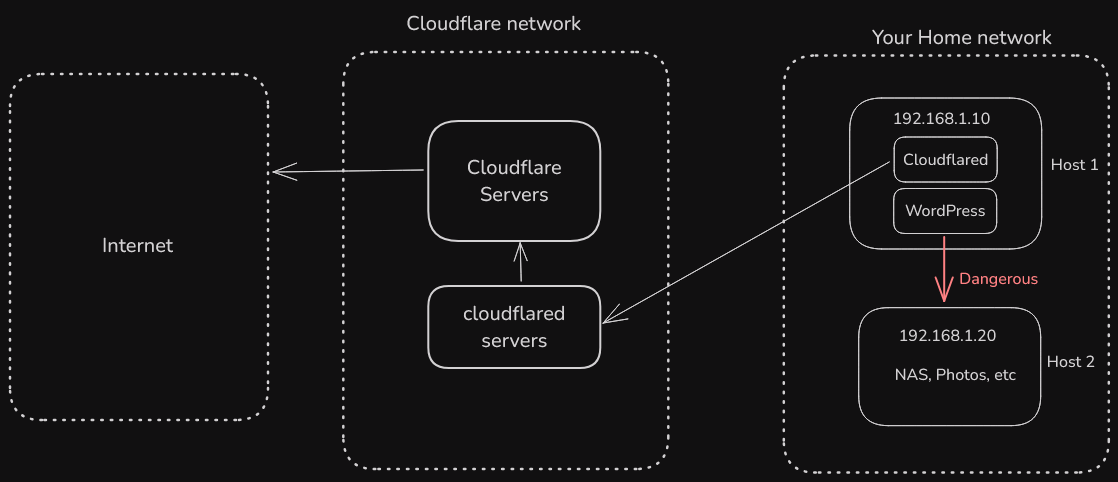
Just as you would with any form of exposing to the internet, you should isolate your host where internet facing service and cloudflared is running. This is because, in the event the service (say, WordPress in this diagram) gets exploited and the hacker got into your network (192.168.1.10), if it has network access (by default it will), you should know that the hacker would be able to find and potentially exploit other services on your network.
What can you do about it?
Put the internet host in its own VLAN, if your router and switch supports it. And then create firewall rules to allow only internet access. This is called a DMZ (demilitarized zone)
What can I host via Cloudflare tunnel
When it comes to hosting via Cloudflare tunnel, only practical concern is routing services such as Plex. Anything else (as long as it is legal) should be fine.
Use of the Services for serving video or a disproportionate percentage of pictures, audio files, or other non-HTML content is prohibited
I personally do not use Cloudflare for exposing Plex, but you maybe able to get away with it, proceed at your own risk.
Setting up Cloudflare Tunnel
Alright, enough talking, let's get into it.
Run your service
This can be a physical or a virtual machine. In this example, I will be using a Debian virtual machine
I have already installed Docker on this VM and now I can start my demo service by using
mansoor@playground:~$ docker run -d -p 8080:8080 mansoor1/go-hello-worldAnd I can see that it works locally, from the same machine
mansoor@playground:~$ curl localhost:8080
Hello from: ea2a3e654bfb
Current Time: Thu, 02 Jan 2025 11:47:55 UTC
Now, we want this service to be accessible from the internet over Cloudflare tunnel.
Add your domain to Cloudflare
You need a domain to use Cloudflare tunnel. If you do not have one, I strongly recommend that you buy one.
If you already have a domain but have not added to Cloudflare, follow Cloudflare docs and add your domain to Cloudflare.
Create the tunnel from Cloudflare dashboard
Login to your Cloudflare account
Account Home -> Zero Trust

Networks -> Tunnels

From there, click on Create tunnel, and choose Cloudflared

Choose any name you would like. I will name it playground-demo and save tunnel
At this point, Cloudflare will show you an option to choose your operating system. I chose Debian 64bit
arm64-bit
Install and start cloudflared
Copy the whole command and paste it into your host where you want to run your service.
mansoor@playground:~$ curl -L --output cloudflared.deb https://github.com/cloudflare/cloudflared/releases/latest/download/cloudflared-linux-amd64.deb &&

sudo dpkg -i cloudflared.deb &&

sudo cloudflared service install eyJhIjoXXXXXXXXXXXXX-redacted-XXXXXXXX
  % Total    % Received % Xferd  Average Speed   Time    Time     Time  Current
                                 Dload  Upload   Total   Spent    Left  Speed
  0     0    0     0    0     0      0      0 --:--:-- --:--:-- --:--:--     0
  0     0    0     0    0     0      0      0 --:--:-- --:--:-- --:--:--     0
100 17.6M  100 17.6M    0     0  13.3M      0  0:00:01  0:00:01 --:--:-- 16.3M
[sudo] password for mansoor:
Selecting previously unselected package cloudflared.
(Reading database ... 37359 files and directories currently installed.)
Preparing to unpack cloudflared.deb ...
Unpacking cloudflared (2024.12.2) ...
Setting up cloudflared (2024.12.2) ...
Processing triggers for man-db (2.11.2-2) ...
2025-01-02T12:04:26Z INF Using Systemd
2025-01-02T12:04:27Z INF Linux service for cloudflared installed successfully
mansoor@playground:~$
We can see that the cloudflared service has successfully started. You can check the status of the daemon using sudo systemctl status cloudflared
Now, back in Cloudflare dashboard, click Next
Configure the Cloudflare tunnel
At this point, you should see a page like this

This is where we tell Cloudflare how to route a domain or subdomain to the service running on our local machine.
DomainI want my demo service to be accessible over the internet at the URL tunnel-demo.esc.sh.
If you want a second level subdomain such as
one.two.example.com, you need to purchase Cloudflare's Advanced certificates. With the free plan, you can only use the root domain and single level subdomains. So, one.example.com and example.com will work fine, NOT one.two.example.com with the free Cloudflare
- Subdomain: If you want to host your service at the root of your domain, you can leave this empty. Make sure to read the Note about subdomains above.
- Domain: This is the domain you own and already configured in Cloudflare
- Path: If you want your service to be accessible only on a path, you can add that here. For example, if I wanted this
Hello Worldservice to be exposed only onesc.sh/hello-world, I could puthello-worldas the Path and cloudflare will route only that path to the tunnel - Type: If you click on the dropdown, you should see a bunch of options. For most of the self hosted web services, it will be
HTTP.- This is the protocol with which the
cloudflareddaemon will connect to your locally running service. There is no reason to useHTTPShere since Cloudflare will anyway terminate SSL/TLS at their edge.
- This is the protocol with which the
- URL: This will be the URL where your local service is available. Most of the time, it will be
localhostwith a port number. In this case, I have my docker container running onlocalhost:8080- This can be an actual domain other than
localhost, if and when you use a reverse proxy as an entry point forcloudflared. If you don't know what that means, you should be fine with simply usinglocalhost:<port number>
- This can be an actual domain other than
Finally, save tunnel
Testing and verifying
At this point, Cloudflare will automatically create a DNS record for tunnel-demo.esc.sh to point to this tunnel. Here is mine

And now we should be able to access https://tunnel-demo.esc.sh/


