Traefik Reverse Proxy with Docker

In this article, I will show you how to have a fully setup self hosting environment with Docker and Traefik as the reverse proxy.
What's covered
- Docker to run everything (Using Docker compose)
- Traefik as a single reverse proxy for all services
- Automatic port discovery (no more exposing ports)
- Automatic TLS/SSL for all services
Some backstory
I have been using Nginx Proxy Manager as the reverse proxy for my self hosting setup. While this worked out great, there was no native docker integration. What do I mean by that? Well, if you use a single host to run a bunch of docker containers, you will have to keep track of the port numbers, configure them in the Nginx Proxy Manager manually and make sure that ports don't clash.
I also did not want to click around the UI too much and wanted my setup in a config file that is easy to replicate. This is when I decided to seriously look into Traefik.
Traefik seemed cumbersome in the beginning
I will admit it. Having used Nginx for so many years, it was very easy to work with, but that is not the case with Traefik. It took me a few tries to make Traefik work for me the way I wanted. But in the end, I am so glad I decided to spend time figuring it out.
The Setup
- We will use a single VM to run all of our services using Docker. I will be using Debian. In my case, my VM is named
playgroundand the IP address is192.168.61.100 - We will have multiple services running as docker containers. For this example, I will use two demo services
- These docker containers will not expose a port to the host (more on this later)
- There will be a single Traefik container running on the same VM as the reverse proxy for all the docker containers we want to expose on a domain name
- We will use a wildcard domain name for our services
- All the services will be using TLS/SSL
- All services will be local only
Step 0 : Requirements
a. Install Docker
You can follow this to install Docker quickly
b. Create a shared docker network
Since we will be using multiple different Docker compose files, by default all these services are going to be in different networks. In the case of this demo, it will have separate network for demo1, demo2 and traefik. This means, Traefik won't be able to reach the containers in the demo1 and demo2 networks.
To fix this, we can create a shared network and put all these services into it. Here, I am creating a network named internal-services. You can choose any name you would like. But the idea is that all these containers share this network.
docker network create internal-servicesdemo1 and demo2, you can put them into two separate networks -- only got to make sure that Traefik is also part of that network c. Nothing running on 80 and 443
In this example, I want to keep things as simple as possible. So, we must run Traefik on port 80 and 443.
A domain name
You should have a domain name if you would like to use TLS/SSL certificates. I strongly recommend that you buy a domain name. Cloudflare is a great provider to buy domains from.
Step 1 : Run the docker services
These are the actual services you want to proxy using Traefik. For the demo, I will run two docker containers using two separate compose.yml
The Directory structure
I like to structure everything properly. This is completely up to you. If you already have containers running all over the place, that is fine too.
This is how I will structure it
mansoor@playground:~$ tree
.
└── apps
    ├── demo1
    │   └── compose.yml
    ├── demo2
    │   └── compose.yml
    └── traefik
        └── compose.yml

5 directories, 3 files
- I put all these "apps" under the
appsdirectory demo1anddemo2are obviously my demo docker services. You may have things likeplex,nextcloudetc instead of these- I decided to go with the new
compose.ymlinstead ofdocker-compose.yml, both should work fine
Start the services
For demo, I will use the hashicorp/http-echo image.
Demo 1
Create ~/apps/demo1/compose.yml with the following content. Note the port number 5000 and the command specifying that the container should respond with Hello from demo1
services:
  demo1:
    image: hashicorp/http-echo
    command: -text "Hello from demo1"
    restart: always
    ports:
    - 5000:5678
    environment:
      - TZ=America/New_York
    networks:
      - internal-services

networks:
  internal-services:
    driver: bridge
    external: true
Demo 2
Similarly, we can create the demo2 service. Note the port number being 5001
services:
  demo2:
    image: hashicorp/http-echo
    command: -text "Hello from demo2"
    restart: always
    ports:
    - 5001:5678
    environment:
      - TZ=America/New_York
    networks:
      - internal-services

networks:
  internal-services:
    driver: bridge
    external: true
Verify that our demo services are working
We can issue a curl command against both the newly created containers
mansoor@playground:~$ curl localhost:5000
Hello from demo1

mansoor@playground:~$ curl localhost:5001
Hello from demo2
So, both are working correctly!
Step 2 : Configure DNS
I want my services to be accessed using my own domain names (including TLS). I want to use demo1.docker-demo.esc.sh and demo2.docker-demo.esc.sh etc to be resolving to my services. In your case, it could be something like plex.example.com, nextcloud.example.com etc.
I am going to point the *.docker-demo.esc.sh wildcard to my playground VM. This will allow me to use any subdomain of docker-demo.esc.sh for any of the services running on the VM.
Update the DNS record
If you use Adguard, PiHole, or any other DNS resolvers in your local network, you can update the DNS record with that. Some of these services may not support wildcard records.
If you do not have that, fear not, there is an easier way – just use your domain's DNS provider and point the wildcard subdomain to the private IP – yes it works. This is what I will be doing.
I use Cloudflare for my domain's DNS. So, I will log into Cloudflare dashboard, go to my domain's DNS configuration and add a record like this.

Make sure that it works.
mansoor@playground:~$ dig demo1.docker-demo.esc.sh @1.1.1.1 +short
192.168.61.100
mansoor@playground:~$ dig demo2.docker-demo.esc.sh @1.1.1.1 +short
192.168.61.100
mansoor@playground:~$
Here, I am using dig command to test the DNS resolution. I am specifically using the DNS resolver 1.1.1.1 using the @ operator to make sure that I am not using the local DNS resolvers and is instead using an internet based DNS resolver.
Step 3 : Configure DNS provider for Traefik
Traefik uses Let'sEncrypt to automatically fetch TLS certificates. For the verification to work, Traefik needs to add a TXT record to the corresponding domain name using the DNS provider's API.
Traefik supports many DNS providers. You can see the list HERE. I use Cloudflare for DNS and will show you how to generate the necessary tokens. For any other provider, look through the DNS provider's documentation to generate the tokens and give that as environment variables to the Traefik container.
Configure Cloudflare Token
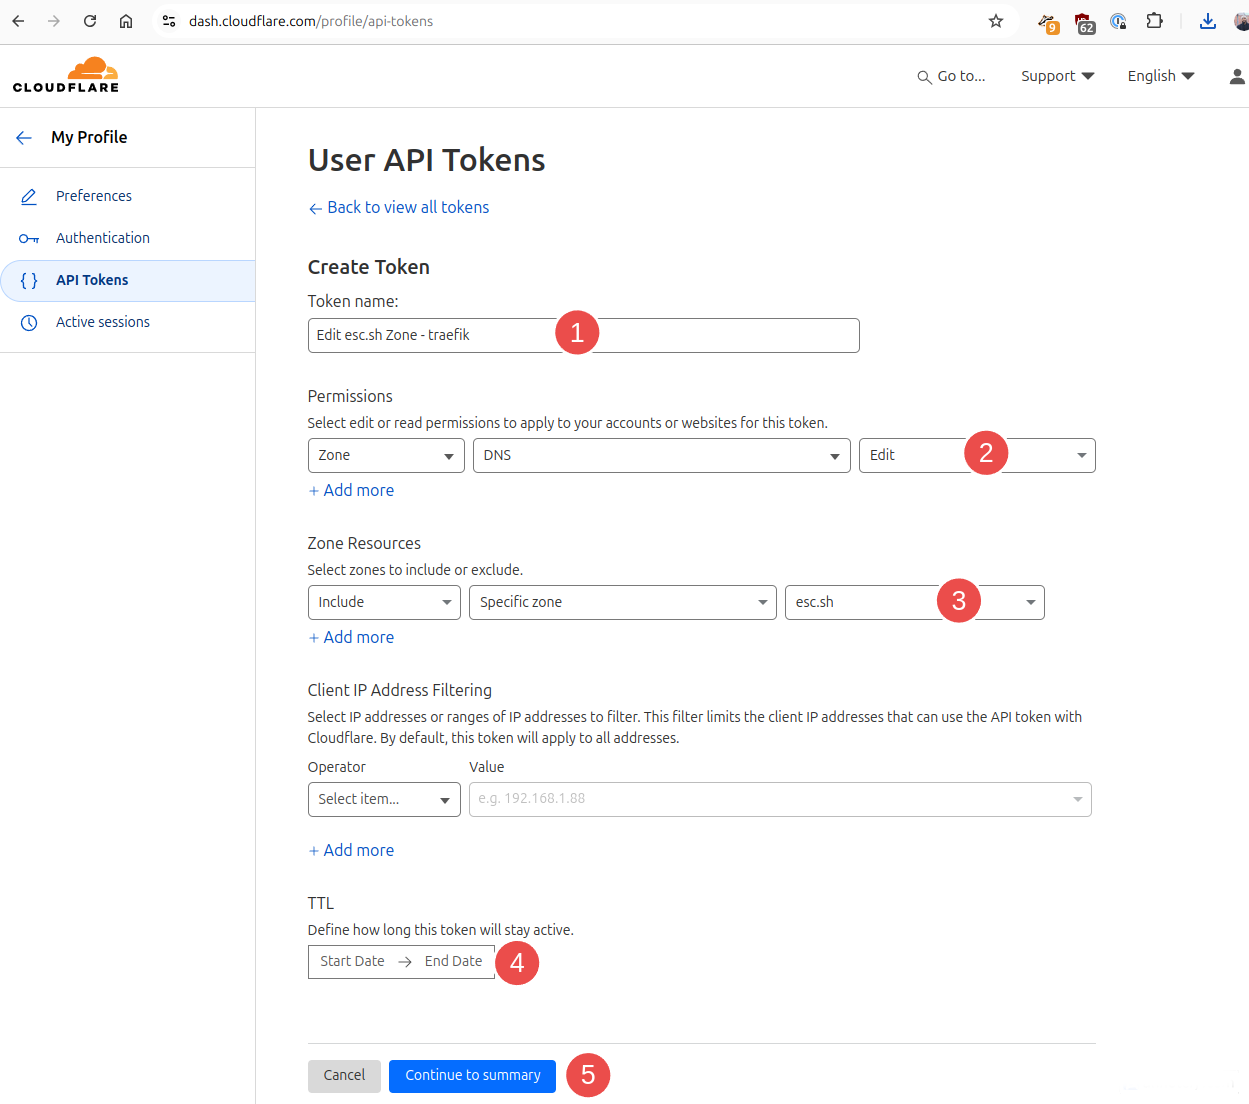
Login to Cloudflare, go to API tokens
Use the Edit zone DNS template

This will pop up a window like this

- Give any name you like. This is just for you to identify different tokens under the Cloudflare dashboard
- We need
Editpermission - From the drop-down, find the domain you want to use. Note that we are specifying a single zone here.
- Do not set an expiry date for the token
- Continue to summary
Next, click Create token
At this point, you should be presented with the token. Copy this. It will not be shown again
We can verify that the token works by running the curl command shown.
➜  ~ curl -X GET "https://api.cloudflare.com/client/v4/user/tokens/verify" \
     -H "Authorization: Bearer xxxxx-redacted-xxxxxx" \
     -H "Content-Type:application/json"
{"result":{"id":"abcd-redacted","status":"active"},"success":true,"errors":[],"messages":[{"code":10000,"message":"This API Token is valid and active","type":null}]}%
Step 4 : Configure Traefik
Finally!
Now create the compose file for traefik at ~/apps/traefik/compose.yml
services:

  traefik:
    image: "traefik:v3.1"
    container_name: "traefik"
    command:
      - "--log.level=DEBUG"
      - "--api.insecure=true"
      - "--providers.docker=true"
      - "--providers.docker.exposedbydefault=false"
      - "--entryPoints.web.address=:80"
      - "--entryPoints.websecure.address=:443"
      - "--entrypoints.web.http.redirections.entryPoint.to=websecure"
      - "--entrypoints.web.http.redirections.entryPoint.scheme=https"
      - "--entrypoints.web.http.redirections.entrypoint.permanent=true"
      - "--certificatesresolvers.myresolver.acme.dnschallenge=true"
      - "--certificatesresolvers.myresolver.acme.dnschallenge.provider=cloudflare"
      - "--certificatesresolvers.myresolver.acme.email=YOUREMAILADDRESS"
      - "--certificatesresolvers.myresolver.acme.storage=/letsencrypt/acme.json"
    ports:
      - "80:80"
      - "443:443"
      - "8080:8080"
    networks:
      - internal-services
    environment:
      - "CF_DNS_API_TOKEN=the_token_from_previous_step"
    restart: always
    volumes:
      - "./letsencrypt:/letsencrypt"
      - "/var/run/docker.sock:/var/run/docker.sock:ro"

networks:
  internal-services:
    driver: bridge
    external: true
Please note the following
dnschallenge.provider=cloudflare. If you use another provider, make sure to update this.- Replace
YOUREMAILADDRESSwith an appropriate email address. This is used to deliver any certificate expiry notifications CF_DNS_API_TOKENshould be the token we created in the previous step. If you use another provider, make sure you use the correct environment variables instead of this one
Bring it up!
Let us start the container and watch the logs
docker compose up -d && docker compose logs -f
Make sure Traefik starts without any error
Step 5 : Configure services to use Traefik
Now that we have Traefik running, we can configure our demo services to finally use the reverse proxy
Demo 1 - reconfigure to use traefik
All we have to do is add a few labels and remove the ports. Here is how the updated compose.yml looks
services:
  demo1:
    image: hashicorp/http-echo
    command: -text "Hello from demo1"
    restart: always
    environment:
      - TZ=America/New_York
    networks:
      - internal-services
    labels:
      traefik.enable: true
      traefik.http.routers.demo1.rule: Host(`demo1.docker-demo.esc.sh`)
      traefik.http.routers.demo1.entrypoints: websecure
      traefik.http.routers.demo1.tls.certresolver: myresolver


networks:
  internal-services:
    driver: bridge
    external: true
Note the following in the compose file
networks: We are using theinternal-servicesnetwork, which traefik also usestraefik.enable: true: This enables Traefik on this containertraefik.http.routers.demo1.rule: Host(demo1.docker-demo.esc.sh)- First, note the
traefik.http.routers.demo1.rule- Here,
demo1is the identifier for our service. This is very important
- Here,
- Secondly, the domain name under
Hostrule. This will be the domain name that will be routing to the container. Make sure you update this correctly
- First, note the
traefik.http.routers.demo1.tls.certresolver: myresolver- The name
myresolvershould be the same what we configured in the Traefik compose file
- The name
Let's bring it up!
docker compose up -d
Check the Traefik logs to see if it retrieved the certs
Back on the other terminal where we are tailing Traefik logs, we should be able to immediately see that Traefik has automatically retrieved the certificates.
In my case, I see this log entry which means it worked
Certificates obtained for domains [demo1.docker-demo.esc.sh] ACME CA=https://acme-v02.api.letsencrypt.org/directory acmeCA=https://acme-v02.api.letsencrypt.org/directory providerName=myresolver.acme routerName=demo1@docker rule=Host(`demo1.docker-demo.esc.sh`)
router identifiers are correct (Just read the previous Note the following in the compose file once again)Demo 2 - reconfigure to use Traefik
Similar to the demo1 service, simply update the compose.yml
services:
  demo2:
    image: hashicorp/http-echo
    command: -text "Hello from demo2"
    restart: always
    environment:
      - TZ=America/New_York
    networks:
      - internal-services
    labels:
      traefik.enable: true
      traefik.http.routers.demo2.rule: Host(`demo2.docker-demo.esc.sh`)
      traefik.http.routers.demo2.entrypoints: websecure
      traefik.http.routers.demo2.tls.certresolver: myresolver


networks:
  internal-services:
    driver: bridge
    external: true
Note the traefik.http.routers.demo2.rule
Bring it up
docker compose up -dLet's verify our services
Let's use curl to see what happens when we open our new service's domain names
➜  ~ curl -I demo1.docker-demo.esc.sh
HTTP/1.1 308 Permanent Redirect
Location: https://demo1.docker-demo.esc.sh/
Date: Fri, 03 Jan 2025 22:04:31 GMT
Content-Length: 18
okay, that's good. It is redirecting the http port to https
➜  ~ curl  https://demo1.docker-demo.esc.sh/
Hello from demo1
What about demo2?
➜  ~ curl  https://demo2.docker-demo.esc.sh/
Hello from demo2
It works!!!
No more worrying about container ports
mansoor@playground:~$ docker ps --format '{{.Names}} {{.Ports}}'
demo2-demo2-1 5678/tcp
demo1-demo1-1 5678/tcp
traefik 0.0.0.0:80->80/tcp, :::80->80/tcp, 0.0.0.0:443->443/tcp, :::443->443/tcp, 0.0.0.0:8080->8080/tcp, :::8080->8080/tcp
Since we are not using the ports in the compose.yml, it does not expose a port to the host. Traefik is able to automatically identify the ports and route to it. This also means that the services are not accessible from outside the host except through Traefik
The Traefik dashboard
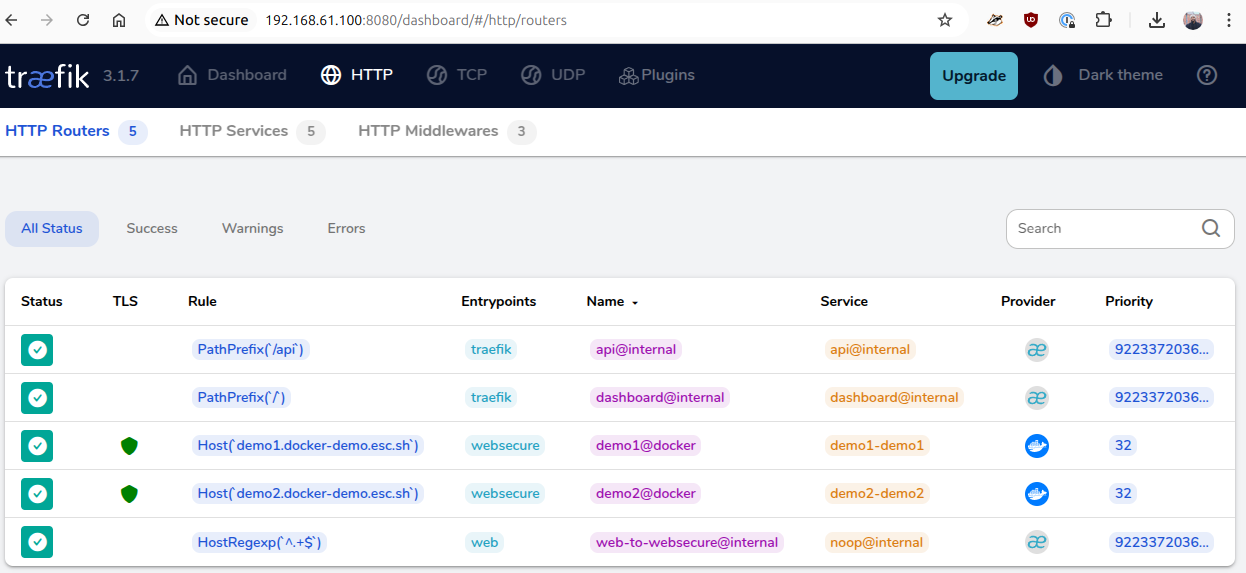
At this point, you should be able to access the Traefik dashboard at your-host-IP:8080
If click on the Explore under the HTTP Routers, you should be able to see our demo1 and demo2 service (along with the traefik endpoints)

That's all!!
Problems? Questions?
Leave a comment and I will try my best to help out!


